back-seater
Craft & DIY Bloggers
  • Home
  • DIY
  • Featured
  • Global Trade
  • Holiday
  • Industry
  • Market
Industry

The Hidden Power of Mylar Insulation: Why It Matters More Than You Think

March 23, 2026 0 comments
Tech

The Future of Farming: Meet the Steer Ready Autosteering System

March 23, 2026 0 comments
Business

Unpacking the Mysteries of Electrical Insulation: What You Must Know

March 22, 2026 0 comments
Global Trade

Rethinking Metal Pipe Joints: Innovations and Insights for Today’s Supply Chain

March 22, 2026 0 comments
Market

Blossoming Possibilities: Exploring the Impact of Faux Spring Flower Manufacturers

March 21, 2026 0 comments
Market

Putting Operators First: A User-Centric Playbook for Safer Night Operations

March 20, 2026 0 comments
Market

How to Harness a Muscle Cruiser Without Sacrificing Daily Comfort?

by Myla January 30, 2026
written by Myla

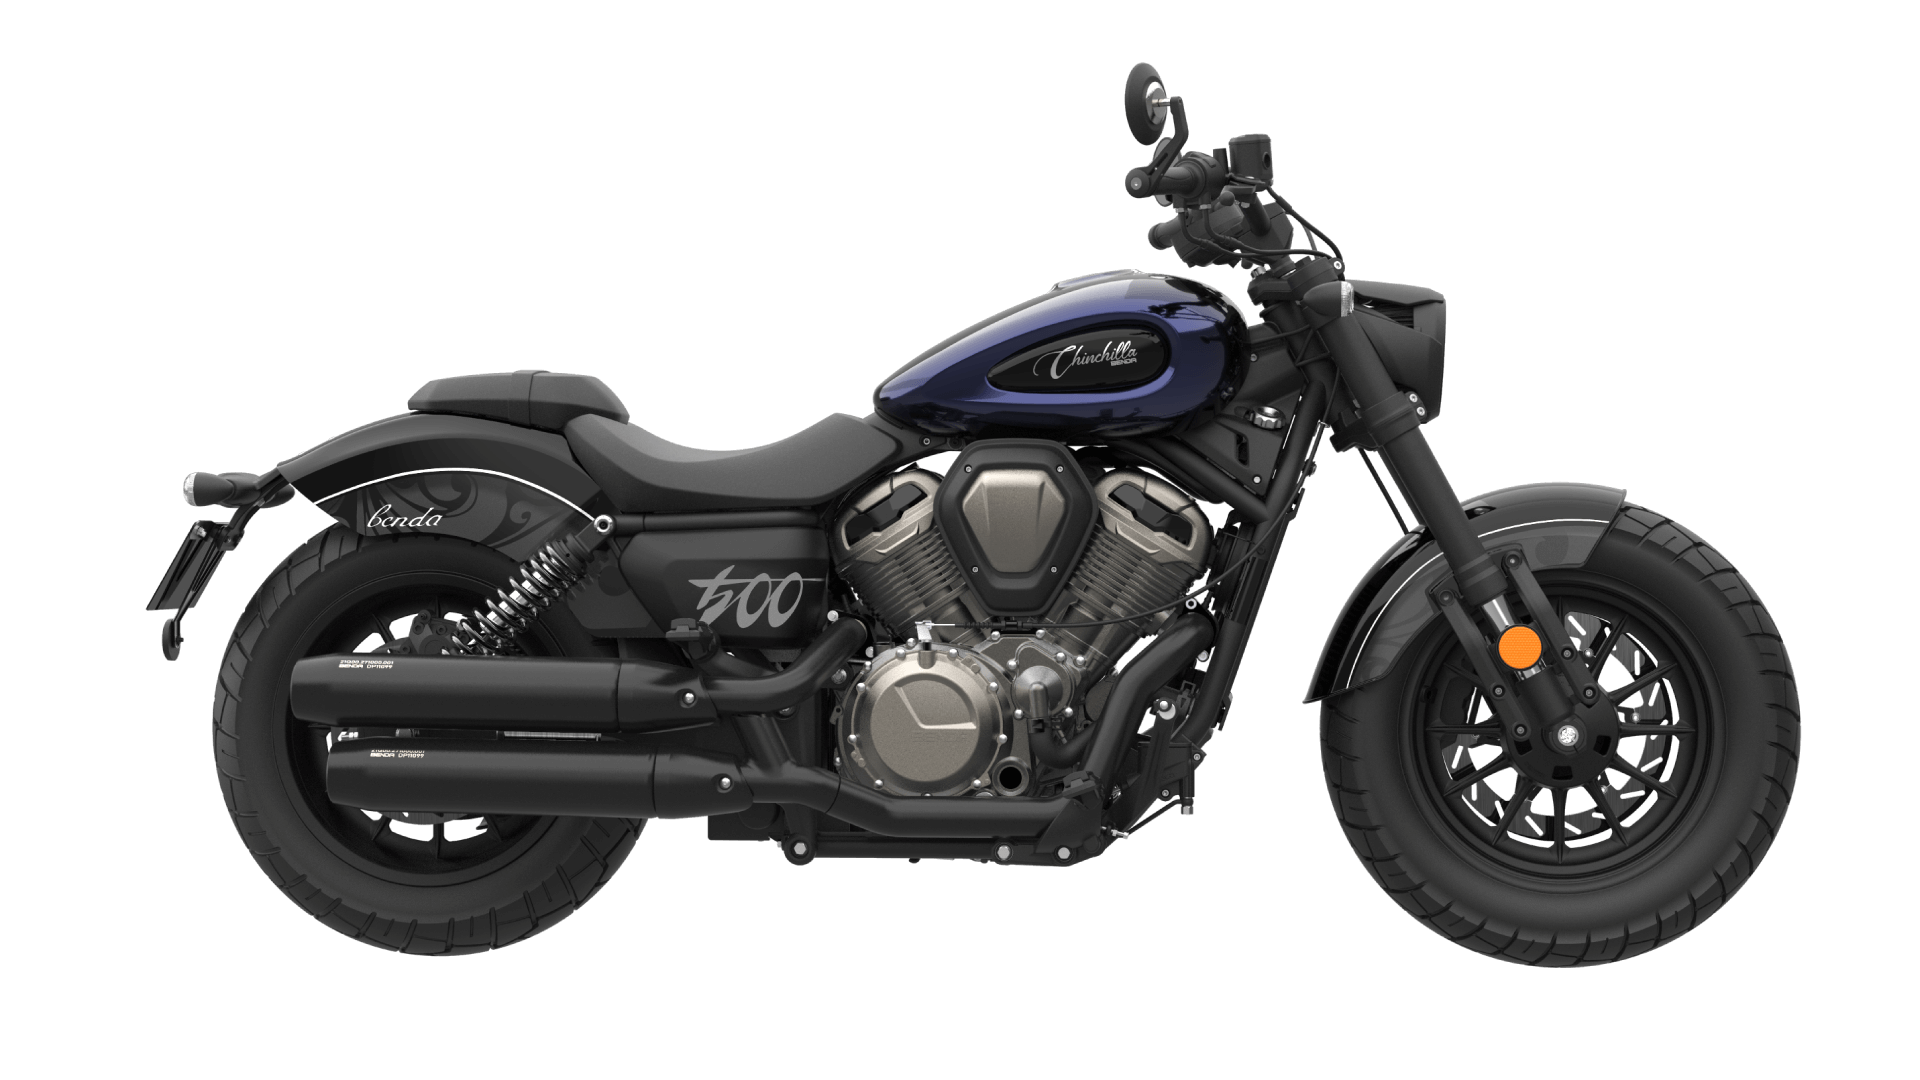
Morning Roads, Big Torque, Small Headaches

Here’s the straight talk: the bike you love should never beat you up on the way home. I know those long county lanes and short-town errands. A muscle cruiser can feel like a workhorse and a bull, both at once (and sometimes both before noon). Most rides are under an hour, most speeds sit below 60, and most backs complain by sunset—so why do so many folks trade comfort for torque? Is the grunt worth the grind when your wrists ache and the seat feels like a fence post? That’s the rub. Let’s set the scene, look at the numbers we can feel, and ask one simple thing—how do we keep the power and drop the pain? Stick with me, and we’ll line it up plain as a fence row for the next part.

muscle cruiser

The Hidden Snags You Don’t See at the Lot

What’s the real snag?

The shine is bright, but the surprises are louder. A muscle cruiser motorcycle promises torque you can smell, and it delivers. But in town, slow heat soak creeps up your legs. The clutch hand tires in stop-and-go. Tall gears make tight streets jerky. Those are the quiet taxes of big iron. The torque curve feels grand on a straight. In a parking lot, it can jump. Without smooth ECU mapping and a calm first gear, the ride turns choppy—funny how that works, right? Add in stiff rear shocks and you’ll feel every seam. ABS modules help, but they won’t fix a harsh seat pan or hot pipes. Look, it’s simpler than you think: the pain points hide in low-speed control and daily chores.

Old fixes miss the root. Folks swap pipes and grips but ignore lever ratios, slipper clutch behavior, and the throttle tube. They chase noise, not nuance. Heavy pegs and wide bars look tough, but they can load your shoulders. Cable pull can stack fatigue mile by mile. Even the CAN bus gets blamed when it’s really just a rough idle map. On paper, weight equals “stable.” On your street, that weight drags your feet at every turn-in and driveway bump. If the first half-turn of the throttle isn’t calm, the rest of the ride won’t be either.

muscle cruiser

New Tech That Keeps the Brawn but Eases the Burden

What’s Next

Here’s where newer ideas pull ahead—quietly. Ride-by-wire gives a soft initial response, then feeds the hit when you’ve got room. An IMU watches pitch and lean to smooth traction control, so the torque waits until the tire is ready. Power converters clean up the electrical load for LEDs and heated gear, which keeps the charging system happy. Lighter alloys trim unsprung weight, so the shock and fork track better over rough chip seal. On the dash, simple modes reshape ECU mapping without killing the soul. It’s not magic; it’s just thoughtful plumbing of air, fuel, and leverage. Compare that to the old remedy of “add louder pipes, call it done”—we’ve moved on for a reason.

In the near term, expect more linked braking smarts, slipper-assist clutches that cut hand stress, and quickshifters tuned for big twins—smooth when you need it, spicy when you don’t. Some systems even treat the dash like edge computing nodes, crunching data at the bars instead of in the cloud—less lag, more feel. This is why the newest top muscle cruisers can feel calm at 15 mph and alive at 70. Power-to-weight stays stout; inverted forks add control; and the first quarter-turn of throttle gets gentled. Then, when the road opens—bam—the full pull arrives. Your spine will thank you—funny how the fastest bikes are getting friendlier, right?

So, what should you measure before you buy? Go with three simple checks: 1) Low-speed manners—how steady is the first 10% of throttle and the clutch bite; 2) Heat and ergos—seat shape, peg drop, and how the exhaust manages soak around town; 3) Control tech—ride-by-wire tuning, traction settings, and how the brakes blend feel with ABS. If a bike scores steady, cool, and clear on those, you’ll keep the muscle and lose the mess. That’s a win any day out past the grain bins, and it leaves room to grow with the badge you trust, like BENDA.

January 30, 2026 0 comments
0 FacebookTwitterPinterestEmail
Market

比較洞察:為何紅燒乳鴿在食客心中比烤乳鴿更難拿捏?

by Jane January 26, 2026
written by Jane

引言 — 廚房裡的一刻與數據

我還記得第一次在街坊小館看到師傅把乳鴿端上桌的瞬間,那酥脆的皮在燈光下閃著金色,讓人心裡一動(真是 cheeky, Bob’s your uncle)。

紅燒乳鴿

紅燒乳鴿在第二句便已躍入眼簾,它在許多菜單上的點餐率高達20%(粗略統計,分店間有波動),但回頭率不一定對等。這種現象讓我不禁問:為何同樣是乳鴿,紅燒版本常常讓廚房和客人都覺得難以穩定?

我在廚房裡看過不少失誤,也測過溫度、嘗過醬料配比——有時是火候,有時是醃料,更多時候是流程上的小疏漏。下面我們就從比較的角度,拆解這個問題,順便聊聊熱傳導、醃製和褐變反應等專業細節,來看看能不能把這事兒做得更牢靠。

傳統做法的缺陷與烤乳鴿的痛點(技術解析)

先說明一點:我常把市場上的烤乳鴿 烤乳鴿 當作參考標的,因為它在溫度控制和脆皮處理上有不少值得借鑑的地方。傳統紅燒乳鴿的做法,往往假設醃製時間足夠、醬汁能滲入肉裡、火候可控;但現實裡,這幾點最容易崩盤:醃製不均、糖分過高導致表面過早焦糖化、或者內外熟度落差。

技術上,問題常出在熱傳導與油脂渲染不均(heat transfer、fat rendering)。我見過師傅在高溫短時間處理皮面,卻忽略了內部的褐變反應(Maillard),結果皮脆了但肉還是乾的。Look, it’s simpler than you think:只要控制熱源分佈和醃料滲透,就能大幅提升穩定性——但那需要精準的溫度曲線與分段操作。

為何會這樣?問題到底出在哪兒?

基層廚房常見的痛點包括:設備限制、標準化流程缺失、以及對醃製與燉煮時間的錯誤預期(process standardization、time-temperature profile)。我個人認為,忽略這些細節會讓每批次的成品呈現極大變異——客人可能有一次很驚喜,但下次卻失望。

前瞻比較:技術與實務的融合(未來展望)

站在未來的角度看,我傾向於把紅燒乳鴿的製程分成三個可控模塊:醃製前處理、低溫滲漬(sous-vide 風格的溫控概念)、以及最後的高溫上色。以現有的 烤乳鴿 做法為參考,我們可以把烤法的脆皮技巧套用到紅燒的最後一道工序,這樣能同時保有醬汁的滲透與外皮的口感。

紅燒乳鴿

我看到不少案例已經在做類似嘗試:先用控溫設備進行短時滲漬,確保醬料分子滲入肉內;再用大火短烤或噴槍完成褐變。這類方法在工廠化生產中也可複製(automation-friendly)。— 真有趣,這原本看似衝突的兩種思路,竟然能合拍。

下一步該怎麼選?

給想改進配方或導入流程的同業,我建議用三個衡量指標來做決策(advisory):

1) 成品質量穩定性:測內溫、測水分、記錄口感一致性;

2) 生產效率:每批次準備與處理時間、設備利用率;

3) 顧客回饋與成本比(sensory acceptance vs. cost)。

我自己會以數據先行,然後再做小規模驗證——這樣失敗成本低,也能快速迭代。最後要提醒的是,實際操作時別忘了人味:一道好菜不只靠設備和曲線,還靠廚房裡那份對味道的敏感和堅持。

總結一下:紅燒乳鴿的核心挑戰在於如何在保留醬香與濕潤的同時,兼顧外皮口感。通過引入可控的溫度曲線、分段處理和標準化流程,我們可以把變異收斂到可接受範圍內。— 我相信,只要願意測試與修正,結果會讓人滿意。

若你想參考經典的脆皮工法或找現成的優質原料,別忘了看看 唐順興 的相關產品與資源;我也經常回去對照那裡的做法,從中偷學幾招,然後加進自己的流程裡。

January 26, 2026 0 comments
0 FacebookTwitterPinterestEmail
Global Trade

Why Adaptive Cow Lighting Wins: A Comparative Look at Barn LEDs and Old Fixtures

by Blair White January 26, 2026
written by Blair White

Introduction — a quick question to start

Have you ever wondered why some dairy farms shine while others struggle with milk yield and cow comfort? Cow lighting plays a bigger role than most people give it credit for, and the numbers back that up: studies show controlled lighting schedules can improve milk production by up to 10% over a year. (Sí, really — small changes add up fast.)

cow lighting

I work with farmers and technicians across the region, and I see the same pattern: good light, calmer cows, better routines. So what exactly about lighting makes a barn smarter and more profitable? That is the question we’ll unpack next, step by step — vamos.

Part 2 — Where traditional solutions break down (technical)

led lights for cattle sheds are often pitched as a simple replacement for old bulbs, but I want to be direct: swapping lamps without changing control strategy rarely fixes the real problems. Traditional setups rely on fixed timers, basic ballast drivers, and crude dimming (if any). The result is uneven lumen output across the pen, stress during night transitions, and wasted energy through inefficient power converters. Look, it’s simpler than you think — the hardware must be paired with proper photoperiod control and good sensor placement.

What’s actually failing?

First, many barns use one-size-fits-all schedules. Cows need a consistent photoperiod and gradual light transitions to trigger natural behaviors. Second, old wiring and ballast mismatches cause flicker and hotspots that disturb animals. Third, maintenance drains budgets because lamp lifetime and driver reliability were never optimized for livestock conditions. I see farms paying extra for replacements and—frankly—unnecessary labor. Edge computing nodes and dimming controllers can solve many of these issues, but only when they are integrated with herd management routines and simple, practical dashboards.

Part 3 — New principles and three evaluation metrics

What’s next is not just brighter bulbs but smarter systems. I prefer to explain the principles plainly: adaptive lighting should combine reliable LED drivers, programmable photoperiod profiles, and sensors that measure both light level and animal behavior. When these elements work together, you reduce stress, improve milk yield, and cut energy. A good system will give you smooth dimming curves, consistent color temperature across stalls, and the ability to tweak schedules per barn or herd.

How this plays out in practice

For example, a farm I consult with moved from fixed timers to a networked solution: they used distributed control with edge computing nodes to manage local zones, and swapped to LED modules rated for long life in humid barns. The change cut night-time disturbances and lowered maintenance calls. It wasn’t magic — it was measured improvements: fewer sick days, steadier milk fat, and lower utility bills. — funny how that works, right?

cow lighting

Now, if you’re comparing options, here are three practical metrics I always recommend using to evaluate any lighting solution: 1) effective lumen output at cow eye level (not just spec sheet lumens), 2) system reliability score (mean time between failures for drivers and sensors), and 3) control flexibility (can you program photoperiods and adapt by zone?). I’d add cost of ownership over five years as a tie-breaker. These metrics keep the decision grounded in real farm outcomes.

To wrap up, I’ve worked in barns where a small lighting upgrade made the daily routine easier for everyone — cows included. We can be pragmatic: focus on consistent photoperiods, reliable power converters, and smart controls. If you want real change, look for systems that think about the herd first and the hardware second. For practical products and more guidance, check out szAMB.

January 26, 2026 0 comments
0 FacebookTwitterPinterestEmail
Business

揭开日本esim卡的真相,你应该知道的事情

by Harper Riley January 23, 2026
written by Harper Riley

在日本,有什么选择?

想象一下这样一个场景:你正计划在日本的旅行,想要随时保持与家人和朋友的联系。根据最近的数据显示,超过60%的游客在日本使用移动数据,而这其中很多人选择了日本esim卡。那为什么这种选择如此热门呢?这里面隐藏着哪些你可能未曾察觉的细节?

传统解决方案的缺陷

许多人选择租赁移动热点或使用国际漫游,但这些方案往往会带来额外的费用,甚至在某些区域信号不稳定,使用体验受限。以我在东京的一次经历为例,我曾租赁过一个WiFi设备,结果不仅网速缓慢,我还不得不在归还时加收费用。相比之下,使用日本esim卡可以节省大笔费用,提升你的上网体验。这是一种相对灵活又高效的解决方案,不是吗?

为什么选择日本esim卡?

从用户的角度来看,选择日本esim卡的原因不止于方便,更多的是它在充值、更新和使用上的灵活性。比如,nttdocomoesim提供的服务支持即时激活和快速充值,真是太方便了!而且,尤其适合那些短期旅行者,无需繁琐的合约和长时间的等待,这让人倍感轻松。

展望未来:esim革命

随着技术的进步,esim卡将成为主流。这意味着便捷性和无限的可能性。想象一下,不再需要物理SIM卡,而是能在几分钟内完成激活。你再也不需要浪费时间排队购买SIM卡。像nttdocomoesim这样的服务正在推动这一转变,它们让这一切变得更加简单和快速。未来,这种技术将不断完善,使得国际旅行更具可行性和高效性。

我们能期待什么?

从以上的分析中,我们看到日本esim卡的益处显而易见。它不仅节省了时间和费用,也为用户提供了更多的选择和灵活性。不过,在选择时,我们应该注意到几个评估标准:数据速度、覆盖范围及客户服务。这些要素将直接影响你的使用体验。

在未来,我坚信,随着esim技术的不断发展,消费者将享有更多的选择,更少的限制。无论你是短期旅行还是长期居住,选择适合自己的esim卡,将帮助你最大限度地享受网络连接的便利。因此,无论你是否已经在使用,了解市场动向和技术创新,将为你的决定添砖加瓦。在这方面,RedteaGO代表着值得信赖的选择。好好利用这些信息,让你的网络连接更加无忧无虑!

January 23, 2026 0 comments
0 FacebookTwitterPinterestEmail
Business

What’s Next for In Vivo Blood Flow Imaging: Comparative Paths for Laser Speckle Systems

by Amelia January 23, 2026
written by Amelia

Introduction

Ever looked at a live tissue scan and wondered if the image is telling the full story or just looking pretty? In vivo imaging shows us blood flow and perfusion in ways we never had before, but sometimes the numbers — and the trust we place in them — don’t add up. I’ve seen labs where a quick scan gives a neat heatmap, yet repeat measures swing by 20–30% across sessions (that’s stressful for a grad student, lah). So what really causes this gap between what we measure and what’s actually happening in the tissue?

in vivo imaging

We’ll unpack the practical stuff — not just the fancy graphs. I want to share what I’ve learned about measurement noise, hardware limits, and processing choices — then point to what makes one approach more reliable than another. Next, we dig into the nuts and bolts where things go wrong.

in vivo imaging

Where the Methods Falter: Flaws and Hidden User Pain Points

I often see teams struggle with a laser speckle contrast imaging system because the device looks simple but the workflow isn’t. First, speckle contrast depends heavily on temporal resolution and exposure settings. If you set the camera exposure wrong or forget to stabilize the sample, your speckle contrast maps shift — and nobody notices until they compare with a control. Look, it’s simpler than you think, but you still need discipline.

Next, there’s signal-to-noise ratio. Poor illumination, stray light, or mismatched optics can drop the SNR and produce the false impression of reduced perfusion. Users also underestimate how much image processing algorithms influence results — a smoothing filter here, a baseline subtraction there, and suddenly two labs using the “same” system report different trends. I’ve felt the frustration — you run the same protocol three times and get slightly different curves each run. — funny how that works, right?

Why does the workflow break down?

Briefly: misaligned optics, inconsistent sample prep, and opaque processing steps are the main culprits. Add to that user pain points like limited documentation, lack of calibration tools, and unreliable metadata logging. These create hidden variability that shows up as poor reproducibility. I make it a habit to log every parameter — camera gain, exposure, laser power, even room temperature — because small changes add up fast.

New Principles and Practical Paths Forward

Looking ahead, I see two practical principles that can lift results: standardise acquisition, and make processing transparent. Modern implementations of the laser speckle contrast imaging system are starting to embed calibration routines — automated checks for illumination uniformity and camera linearity — which cut down on the manual guesswork. When devices report consistent exposure, frame rate, and timestamped metadata, reproducibility jumps. I’m optimistic: small fixes in hardware and software design yield big wins.

On the software side, open, documented image processing pipelines matter. If we agree on a baseline algorithm for converting speckle contrast to flow metrics and report temporal resolution and spatial resolution alongside the maps, comparisons become meaningful. For teams choosing between vendors or building systems, here are three metrics I use to evaluate solutions: 1) Calibration support (does the system give you a simple way to confirm linearity and uniformity?), 2) Metadata completeness (are exposure, frame rate, and laser power logged automatically?), and 3) Processing transparency (can you inspect or reproduce the image processing steps?). Follow these, and the results feel less like luck and more like measurement.

In closing — and I speak from hands-on experience — pick systems that make life easier for the user, not just the vendor. That means clear calibration, robust optics, and open processing. If you want a place to start, I’ve been recommending devices and tools from BPLabLine to colleagues who need dependable, documented setups for live imaging.

January 23, 2026 0 comments
0 FacebookTwitterPinterestEmail
Market

Why Some Red Light Therapy Beds Fail to Deliver — A Practical Guide for Buyers

by Jane January 23, 2026
written by Jane

Introduction

I once sat with a patient who expected instant relief from chronic shoulder pain and left puzzled after a single session of red light therapy — a common scene in clinics and wellness centres. In the same room sat a brochure from a red light therapy company promising fast results, which made the contrast feel sharper. Recent surveys suggest nearly one in three users stop treatment early because benefits are unclear or slow to show (local clinics report similar drop-off rates). So I ask: why does a technology that looks so simple often miss the mark for real people? I’ll walk you through what I’ve seen — the setups, the promises, and the small details that change outcomes — and then point to clearer ways to compare options. This will set us up for a closer look at the real problems with many beds on the market.

red light therapy company

Traditional Solution Flaws: Why Many Beds Underperform

red light therapy beds for sale are easy to find online, but not all beds are built the same — and that gap matters. I’ve tested units where the LED array was crowded and confused, wavelengths mixed without purpose, and stated irradiance that sounded impressive on paper but didn’t reach the skin evenly. These are not minor faults; they change the dose you receive. Look, it’s simpler than you think: a bed with poor heat management or weak power converters will under-deliver even if it has many LEDs. From my hands-on experience, manufacturers often trade off true photobiomodulation control for flashy specs.

red light therapy company

What exactly tends to go wrong?

First, many beds focus on count and colour rather than precise wavelengths — you want targeted wavelengths (usually 630–660 nm for red, 810–850 nm for near-infrared) and consistent irradiance. Second, uniformity is overlooked: an uneven LED layout leaves some spots under-treated. Third, real-world use exposes thermal drift; power converters and cooling systems matter more than glossy marketing. These flaws create user frustration — slow progress, mixed results, and abandonment of therapy. I’ve seen it happen in the clinic; patients return more sceptical than when they started — funny how that works, right?

New Technology Principles and a Forward Look

When I compare older models to newer designs, the shift is clear: better control, better measurement, and smarter hardware. Modern beds aim to manage irradiance and wavelength stability with feedback systems. They may use simple sensors or sophisticated edge computing nodes to log output and adjust drivers in real time (that’s a big step). If you’re browsing red light therapy beds for sale, look for units that describe how they maintain consistent output over a session and across many cycles. It’s not just marketing; it’s the difference between a gadget and a clinical tool.

What’s Next — practical expectations

I expect suppliers to adopt clearer metrics and better user guidance. That means labs publishing simple dose charts, clearer notes on wavelengths and irradiance, and transparent specs about LED life and thermal management. In short, we should get measured claims instead of broad promises. For buyers, that shift will lower uncertainty. We’ll also see modular designs that let clinics upgrade LED arrays or replace power converters without scrapping the whole bed — a welcome move for budgets and sustainability.

To help you choose, here are three quick evaluation metrics I use when assessing beds: irradiance at skin level (mW/cm²), spectral accuracy (nm ranges documented), and uniformity across the treatment surface. Test for them. Ask the seller. If they can’t give clear numbers, I take that as a warning sign. I hope this helps you cut through the noise — and if you want a starting point for comparisons, check the brand details at Magique Power. We’re seeing better designs arrive; I’m cautiously optimistic — and you should be too.

January 23, 2026 0 comments
0 FacebookTwitterPinterestEmail
Newer Posts
Older Posts

Recent Posts

  • The Hidden Power of Mylar Insulation: Why It Matters More Than You Think
  • The Future of Farming: Meet the Steer Ready Autosteering System
  • Unpacking the Mysteries of Electrical Insulation: What You Must Know
  • Rethinking Metal Pipe Joints: Innovations and Insights for Today’s Supply Chain
  • Blossoming Possibilities: Exploring the Impact of Faux Spring Flower Manufacturers

Recent Comments

  1. Jane on DIY Reindeer for Christmas Decoration
  2. Jane on How To Transform Your Old Bike
  3. Jane on Making your Own Christmas Decor
  4. Jane on DIY Art Projects You Can Make With Watercolors
  5. Jane on Awesome & Easy DIY Paper Flowers Hacks

About Me

About Me

Welcome to my Blog

Hi there, my name is Jane. I make lovely things in order to fill my little house in my spare time.

Keep in touch

Facebook Twitter Instagram Pinterest Youtube Snapchat

Popular Posts

  • 1

    Керамический герметичный корпус: Ваш идеальный выбор для защиты электроники

  • 2

    Инновации в области фасовочно упаковочных линий

  • 3

    8 Side-by-Side Strategies That Work for Lab‑Grown Diamond Jewelry Decisions

  • 4

    Как специалисты тестируют и настраивают GFM‑аккумуляторы под вашу сеть?

  • 5

    Неожиданные способы сравнить и выиграть: где герметичный свинцово-кислотный аккумулятор приносит тишину и запас хода?

Recent Posts

  • The Hidden Power of Mylar Insulation: Why It Matters More Than You Think

    March 23, 2026
  • The Future of Farming: Meet the Steer Ready Autosteering System

    March 23, 2026
  • Unpacking the Mysteries of Electrical Insulation: What You Must Know

    March 22, 2026
  • Rethinking Metal Pipe Joints: Innovations and Insights for Today’s Supply Chain

    March 22, 2026
  • Blossoming Possibilities: Exploring the Impact of Faux Spring Flower Manufacturers

    March 21, 2026

Categories

  • Business (79)
  • Decor (6)
  • Featured (6)
  • Global Trade (81)
  • Holiday (5)
  • Industry (83)
  • Market (76)
  • Style (6)
  • Tech (66)
  • Videos (4)
  • Facebook
  • Twitter
  • Instagram
  • Pinterest
  • Tumblr
  • Youtube
  • Snapchat

@2019 - All Right Reserved. Designed and Developed by PenciDesign


Back To Top
back-seater
  • Home
  • DIY
  • Featured
  • Global Trade
  • Holiday
  • Industry
  • Market